


What is the Shortcut Key to Create a Ledger in Tally ERP 9?
Introduction
In Tally ERP 9, you can create a new ledger instantly using a simple shortcut key. This feature saves time and streamlines daily accounting tasks. In this guide, you’ll learn the exact shortcut key to create a ledger, along with practical steps and tips to organize your accounts effortlessly in Tally ERP 9.
Tally ERP 9 is well-known for its efficiency, especially when using keyboard shortcuts. Instead of navigating multiple menus, you can create, modify, and access ledgers in seconds using shortcut keys.
The Direct Shortcut Key to Open the ‘Create Ledger’ Window
The shortcut key to create a new ledger in Tally ERP 9 is:
Alt + C
This shortcut works while you are on a voucher entry screen or even in certain master configuration windows. When you press Alt + C, the “Create Ledger” screen opens instantly, allowing you to add a new ledger without leaving your current task.
For example:
- While entering a Sales Voucher, if you need to create a new “Customer Ledger,” press Alt + C on the Party A/c Name field.
- Enter the ledger details, save it, and continue with the voucher entry seamlessly.
This shortcut eliminates the need to exit the voucher screen and go back to the main menu, saving valuable time during accounting operations.
Alternate Navigation Methods Using the Keyboard Only
If you are not entering a voucher and wish to create ledgers manually, you can still do it entirely using keyboard navigation. Here’s how:
- From the Gateway of Tally, press A (for Accounts Info).
- Press L (for Ledgers).
- Press C (for Create).
So, the sequence becomes:
Gateway of Tally → Accounts Info → Ledgers → Create
This method allows users who prefer working without mouse interaction to navigate swiftly.
When and Where to Use the Shortcut (Gateway of Tally / Accounting Info. / Masters Screen)
You can use the Alt + C shortcut in multiple contexts:
- During voucher entry: Ideal for creating a ledger on the fly when the system prompts for a ledger that doesn’t exist.
- From the Gateway of Tally: Use it when setting up ledgers initially before recording transactions.
- In master screens: When modifying or adding groups and related accounts.
Understanding when to use which method depends on your workflow. If you’re entering daily vouchers, use Alt + C. If you’re setting up accounts at the start of the financial year, use the navigation method via Accounts Info.
Step-by-Step Process to Create Ledger Using Shortcut Keys
Now, let’s break down the entire process of creating a ledger using shortcut keys in Tally ERP 9. This section assumes you’re already familiar with basic navigation in Tally.
Step 1: Open Tally ERP 9 and Select Your Company
- Launch Tally ERP 9 from your desktop or start menu.
- From the company list, select the company in which you wish to create the ledger.
- Enter the username and password if company security control is enabled.
Once inside the company, you will see the Gateway of Tally screen. This is the main hub for all accounting, inventory, and reporting operations.
Step 2: Use the Shortcut Key Combination to Open the Ledger Creation Screen
There are two primary ways to reach the ledger creation screen using shortcuts:
Option 1: From the Gateway of Tally
- Press A (Accounts Info) → L (Ledgers) → C (Create).
- Shortcut path: A + L + C
- Shortcut path: A + L + C
Option 2: During Voucher Entry
- While recording a transaction, place your cursor in a ledger field (like “Party A/c Name” or “Credit Account”).
- Press Alt + C to instantly open the Create Ledger window.
This flexibility ensures that you can create new ledgers from anywhere in Tally, whether you’re preparing accounts initially or recording day-to-day vouchers.
Step 3: Enter Ledger Name, Group, and Opening Balance
Once the Ledger Creation screen appears, fill in the following details:
- Name: Enter the name of the ledger. Example: “Office Rent,” “Electricity Expense,” or “ABC Traders.”
- Under Group: Choose the correct group classification. This is crucial because it determines how the ledger appears in reports.
- For example:
- Sales accounts → under Sales Accounts
- Purchases → under Purchase Accounts
- Rent, salaries, etc. → under Indirect Expenses
- Debtors → under Sundry Debtors
- Creditors → under Sundry Creditors
- Sales accounts → under Sales Accounts
- For example:
- Opening Balance: If the ledger carries a balance from the previous financial year, enter the amount and specify whether it is a debit (Dr) or credit (Cr).
Pro Tip:
Choose the right group carefully. Incorrect grouping can lead to misclassification in reports and financial statements.
Step 4: Save the Ledger Using Shortcut Keys
After entering all details, press Ctrl + A to save the ledger instantly.
This shortcut works across most Tally screens to accept and save the current entry without navigating to the bottom of the form or clicking “Yes.”
Once saved, the system confirms the creation, and you can immediately use the ledger in vouchers or reports.
Step 5: Verify the Ledger in the Chart of Accounts
After creating the ledger, it’s good practice to verify that it has been saved correctly.
To do this:
- From the Gateway of Tally, go to Display → List of Accounts.
- You’ll find your newly created ledger under the respective group.
- Alternatively, go to Accounts Info → Ledgers → Alter, and use the search function to locate and review the ledger details.
Verifying ensures that your ledger has been placed under the correct group and that all balances are accurate.
Best Practices for Efficient Ledger Management
Creating ledgers correctly is only the beginning. To maintain accurate financials, follow these best practices:
- Avoid duplication: Don’t create multiple ledgers for the same account. Use search or “Display Ledgers” to check before creating new ones.
- Use consistent naming: Stick to a standardized naming format, like “Customer – Name” or “Expense – Category,” for easy identification.
- Review grouping periodically: Misclassified ledgers can distort financial statements. Review group assignments quarterly.
- Use keyboard shortcuts frequently: Keyboard-based operations in Tally are faster and reduce data entry fatigue.
- Backup regularly: Maintain data backups to prevent accidental data loss during ledger creation or modification.
Understanding Ledger Creation Screen in Tally ERP 9
Once you open the Ledger Creation screen in Tally ERP 9, you’ll notice several fields that need to be filled in correctly for accurate financial reporting. Each field plays a specific role in classifying and recording your business’s transactions. A clear understanding of these fields helps ensure that ledgers are created correctly and reports remain accurate.
Explanation of Each Field — Name, Under Group, Inventory Values, and Opening Balance
Let’s break down the key fields in the Ledger Creation window and understand their purposes.
1. Name
This is the ledger’s title — it represents the specific account you are creating. For example, if you are recording rent expenses, you might name the ledger “Office Rent” or “Shop Rent.”
Tips:
- Use clear, descriptive names to avoid confusion later.
- Avoid abbreviations or generic names like “Misc. Expenses,” unless necessary.
- For customers or suppliers, use their exact trade name for consistency.
2. Under Group
This is one of the most crucial fields in ledger creation. It determines where the ledger will appear in reports and how it behaves in accounting transactions.
Tally provides a pre-defined set of accounting groups such as:
- Capital Account
- Current Assets
- Sundry Debtors
- Sundry Creditors
- Indirect Expenses
- Sales Accounts
- Purchase Accounts
- Loans (Liability)
Each ledger must belong to one of these groups or a subgroup created by you. For example:
- Customer ledgers → Sundry Debtors
- Supplier ledgers → Sundry Creditors
- Rent, telephone, or advertising → Indirect Expenses
- Fixed Assets → Fixed Assets
Tip: Choosing the correct group ensures accurate classification in the Trial Balance, Profit & Loss Account, and Balance Sheet.
3. Inventory Values Are Affected
This field appears when integrated accounts with inventory is enabled in your company settings. It asks whether the ledger should affect inventory reports.
For example:
- For ledgers like Sales, Purchases, or Stock Items, select Yes.
- For Expenses, Income, or Capital Accounts, select No.
Incorrectly marking this option can lead to discrepancies between your accounting and inventory books.
4. Opening Balance
If a ledger has a previous balance carried forward from the last financial year, you can record it here.
- Enter the amount and specify whether it is Dr (Debit) or Cr (Credit).
- Example: A customer who owes you ₹50,000 → Opening Balance = 50,000 Dr
- A supplier you owe ₹75,000 → Opening Balance = 75,000 Cr
- Example: A customer who owes you ₹50,000 → Opening Balance = 50,000 Dr
This ensures continuity in your accounting data across financial years.
Common Mistakes to Avoid While Entering Ledger Details
- Incorrect Group Selection:
Misclassifying a ledger (e.g., putting an expense under Assets) will distort financial reports. Always verify the correct group. - Duplicating Ledger Names:
Avoid creating multiple ledgers for the same entity, as it complicates reconciliation and tracking. - Leaving Opening Balances Blank:
For ongoing accounts, missing opening balances can result in mismatched trial balances. - Inventory Mismatch:
If “Inventory Values are Affected” is selected incorrectly, stock and accounting books may not match. - Irrelevant Ledger Names:
Use standardized naming conventions (e.g., “Expense – Rent,” “Customer – ABC Traders”) to maintain consistency.
Other Useful Shortcut Keys Related to Ledger in Tally ERP 9
Tally ERP 9 offers several shortcut keys specifically designed for ledger-related operations. These shortcuts enhance productivity and reduce dependence on mouse navigation.
Shortcut to Alter an Existing Ledger
If you wish to modify an existing ledger, use the following sequence:
- From the Gateway of Tally, press:
A → L → A (Accounts Info → Ledgers → Alter)
Alternatively, when in the ledger list, highlight the desired ledger and press Enter to open it for alteration.
There is no single direct shortcut like Alt + C for alteration, but this sequence is the fastest method through keyboard navigation.
Shortcut to Display Ledger Report
To view a ledger’s detailed report:
- From any screen, press D → A → L (Display → Account Books → Ledger).
- Select the ledger name and press Enter to view transactions and closing balance.
While viewing reports, you can use Alt + F2 to change the date range or F12 to configure display options.
Shortcut to Delete a Ledger
To delete an unwanted ledger:
- Go to Gateway of Tally → Accounts Info → Ledgers → Alter.
- Select the ledger you wish to delete.
- Press Alt + D.
- Confirm the deletion when prompted.
Note: You can only delete a ledger that has no voucher entries. If any transaction is linked to it, Tally will not allow deletion until those entries are removed.
Shortcut for Navigating Between Multiple Ledger Screens
When creating or modifying multiple ledgers, use these helpful keys:
- Page Up / Page Down: Move to the previous or next ledger in the list.
- Ctrl + N / Ctrl + M: Switch between calculator mode and normal mode.
- Esc: Exit the current screen or go one level back.
- Ctrl + A: Save and accept all entries instantly.
Efficient navigation between ledger screens significantly improves workflow speed, especially for accountants managing large data volumes.
Difference Between Manual Ledger Creation and Shortcut Key Method
Many users begin ledger creation through manual menu navigation. While effective, it is slower than using shortcut keys. Let’s compare both methods and understand the advantages.
Manual Creation via Menu Navigation
The manual method involves navigating step by step through the Tally menu:
- Gateway of Tally → Accounts Info
- Ledgers → Create
- Fill in details → Save
This approach is useful for beginners who are still learning Tally’s structure. It helps users understand how ledgers are grouped under different accounting categories.
However, it becomes time-consuming when dealing with multiple ledgers, as each requires repetitive navigation.
Shortcut Key Method
The shortcut key method (using Alt + C) allows you to create ledgers directly from voucher screens or within master creation windows. This makes it more efficient and fluid.
For instance, while recording a Sales Voucher, if a new customer ledger doesn’t exist, pressing Alt + C instantly opens the Create Ledger window without leaving the voucher screen.
This reduces steps, minimizes context switching, and prevents workflow interruptions.
Time Efficiency Comparison
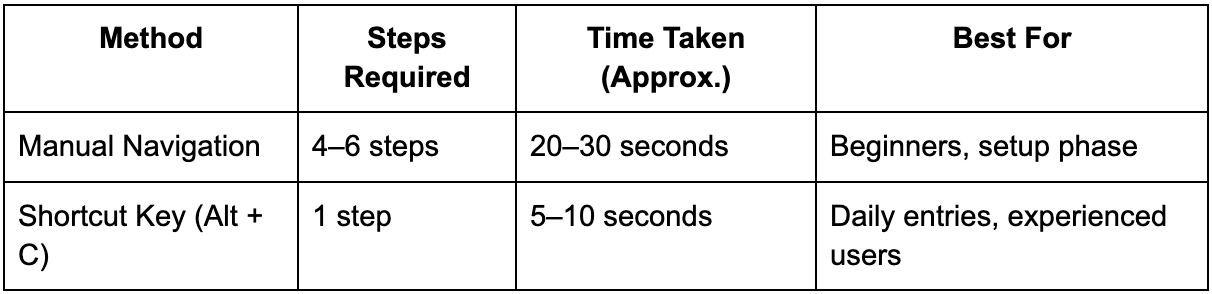
Shortcut-based ledger creation saves significant time during data entry operations, especially in organizations handling hundreds of daily transactions.
Best Practices for Accountants and Data Entry Operators
- Memorize key shortcuts: Alt + C (Create), Ctrl + A (Save), Alt + D (Delete).
- Group ledgers logically: Follow consistent naming and grouping patterns.
- Validate data daily: Regularly verify ledger entries for accuracy and completeness.
- Avoid unnecessary ledgers: Maintain a clean chart of accounts to simplify audits.
- Use keyboard shortcuts for speed: Keyboard-based work is faster and reduces chances of input error compared to mouse navigation.
Troubleshooting: If Ledger Shortcut Key is Not Working
Sometimes, users face issues where shortcut keys like Alt + C do not function as expected. This may be due to system settings, software configuration, or Tally environment issues. Below are the most common reasons and quick solutions.
Common Issues and Their Quick Fixes
- Keyboard Shortcuts Disabled:
- Some users unknowingly disable shortcuts in Tally’s configuration settings.
- Go to F12: Configure → General → Use Shortcut Keys = Yes.
- Some users unknowingly disable shortcuts in Tally’s configuration settings.
- System Shortcut Conflict:
- Certain Windows applications or background programs may override Alt key combinations.
- Try closing background apps or changing system-level shortcut assignments.
- Certain Windows applications or background programs may override Alt key combinations.
- Data Corruption or Version Glitch:
- If shortcuts fail only in a specific company file, there might be a data configuration issue.
- Reopen the company or run Tally Data Repair (Ctrl + Alt + R) from the startup screen.
- If shortcuts fail only in a specific company file, there might be a data configuration issue.
- Incorrect Focus Area:
- The shortcut works only when the cursor is in a valid ledger field during voucher entry.
- Make sure the focus is on a field that allows ledger creation.
- The shortcut works only when the cursor is in a valid ledger field during voucher entry.
Checking Keyboard Configuration and Tally Version
Ensure your keyboard layout is correctly configured to your regional settings (generally English - India). Some alternate keyboard layouts may not detect Alt combinations properly.
Also, check your Tally ERP 9 version. Older builds may contain shortcut-related bugs that are fixed in newer updates.
- Go to Help → About Tally to view your version.
- Update to the latest Release version from Tally Solutions’ official website if needed.
Restoring Default Key Mappings in Tally ERP 9
If shortcuts still don’t work, restoring the default configuration often helps.
Steps:
- Close Tally completely.
- Navigate to the Tally installation folder (usually C:\Tally.ERP9).
- Locate the configuration file tally.ini.
- Open it using Notepad.
- Check for any custom key mappings or disabled commands — reset them to default.
- Save and reopen Tally.
Alternatively, reinstalling Tally ERP 9 (after taking a full backup) ensures all key bindings revert to default.
Pro Tips to Speed Up Ledger Management in Tally ERP 9
While Tally ERP 9 already offers an efficient accounting system, professionals can further streamline their workflow by applying a few smart ledger management techniques. Whether you manage a small business or handle enterprise-level accounting, these pro tips help improve speed, maintain accuracy, and reduce manual errors.
Use Predefined Groups Efficiently
Tally ERP 9 comes with a well-structured hierarchy of predefined accounting groups. Many new users overlook this built-in structure and end up creating unnecessary custom groups, which can lead to confusion and reporting inconsistencies.
Here’s how to use predefined groups effectively:
- Understand the group hierarchy:
Tally organizes ledgers under primary and sub-groups. For example:
- Primary Groups: Capital Account, Current Assets, Current Liabilities, Direct Income, Indirect Expenses.
- Sub-Groups: Sundry Debtors (under Current Assets), Indirect Income (under Profit & Loss).
- Primary Groups: Capital Account, Current Assets, Current Liabilities, Direct Income, Indirect Expenses.
- Avoid duplication:
Instead of creating a new group like “Sundry Debtors – Customers,” simply use the default “Sundry Debtors.” Tally’s reporting is already optimized for these categories. - Use search and filtering:
When creating ledgers, use the search box in the “Under Group” field to find existing groups quickly. - Follow consistent logic:
For instance, always place customer accounts under Sundry Debtors and supplier accounts under Sundry Creditors. Consistency ensures smoother reconciliation and cleaner financial statements.
By leveraging predefined groups instead of creating unnecessary ones, you maintain standardization across financial years and simplify audit trails.
Create Multiple Ledgers in Batch Mode
Creating ledgers one by one is suitable for small-scale businesses, but if you’re handling hundreds of accounts, the Multiple Ledger Creation feature is a major time-saver.
Here’s how to use it:
- From the Gateway of Tally, go to:
Accounts Info → Ledgers → Create → Multiple Ledgers. - Select the Group under which you want to create the ledgers (for example, Sundry Debtors).
- Enter all ledger names in the list that appears.
- Press Ctrl + A to save them all at once.
This batch creation process reduces repetitive actions and ensures uniform grouping. It’s especially helpful during company setup, GST migrations, or when onboarding new clients.
Tip: Before bulk creation, prepare your ledger names in an Excel sheet to maintain consistency.
Backup Ledgers Before Making Bulk Edits
Before performing mass alterations or deletions, always backup your Tally data. Ledger data is crucial for your company’s accounting integrity, and a small mistake in bulk editing can disrupt reports or cause imbalance in your trial balance.
Steps to create a backup:
- From the Gateway of Tally, go to:
F3: Company → Backup. - Choose the source folder where your company data is stored.
- Select the destination folder where you want the backup saved.
- Press Enter to confirm.
Tally creates a .900 or .TBK backup file that can be restored anytime.
Additional Tip: Create a backup before major updates, GST reclassification, or merging ledgers between branches. It ensures you can revert quickly if anything goes wrong.
Frequently Asked Questions (FAQ)
What is the Default Shortcut to Create a Ledger in Tally ERP 9?
The default shortcut key to create a new ledger in Tally ERP 9 is Alt + C.
This shortcut works when you are in any voucher or master entry screen. For instance, if you are entering a Sales Voucher and realize that a customer’s ledger is missing, press Alt + C directly in the “Party A/c Name” field. A “Create Ledger” window will appear instantly, allowing you to create and save the ledger without leaving the voucher screen.
This feature is especially useful for accountants handling high transaction volumes who need to add ledgers on the go.
Can I Customize the Shortcut Key for Ledger Creation?
Tally ERP 9 does not provide a built-in feature to customize shortcut keys directly from the user interface. However, advanced users or system administrators can modify the tally.ini configuration file to adjust some key mappings manually.
That said, this practice is generally not recommended unless you are experienced with Tally’s internal configurations, as it may cause conflicts with other shortcuts.
Instead, the best approach is to memorize default shortcuts like:
- Alt + C → Create Ledger
- Ctrl + A → Save Entry
- Alt + D → Delete Entry
- Page Up / Page Down → Scroll between ledgers
These default keys are consistent across most Tally versions and are optimized for speed and usability.
Is the Shortcut Same in Tally Prime and ERP 9?
The core shortcut for ledger creation (Alt + C) remains the same in both Tally ERP 9 and Tally Prime.
However, Tally Prime has introduced a more modern interface and simplified navigation. For instance, Tally Prime allows users to open the “Create Ledger” window from the top “Create” menu as well.
Here’s a quick comparison:
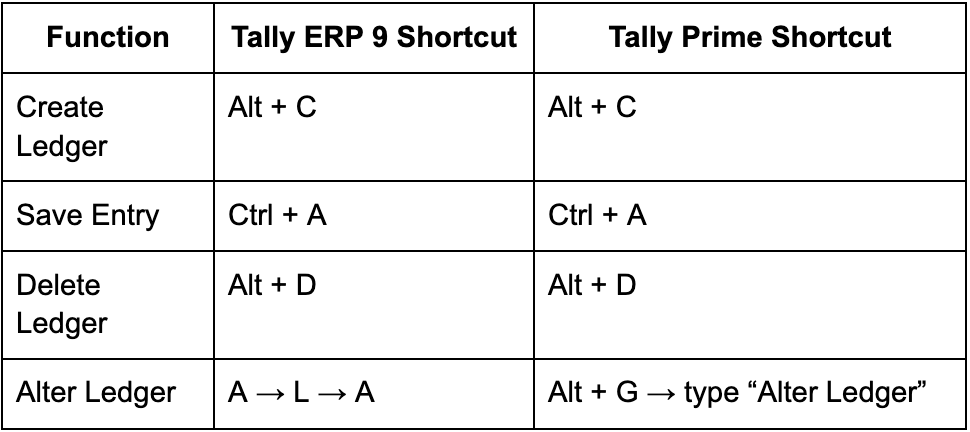
In short, if you’re transitioning from ERP 9 to Tally Prime, your keyboard skills remain relevant. You just get a cleaner interface and slightly enhanced menu navigation.
How to Create Ledgers for GST Automatically Using Shortcuts?
Tally ERP 9 allows you to create GST-related ledgers quickly using the same shortcuts, but it also provides templates for tax configuration.
Follow these steps to create GST ledgers efficiently:
- Enable GST in your company:
- Go to F11: Features → Statutory & Taxation → Enable Goods & Services Tax = Yes.
- Go to F11: Features → Statutory & Taxation → Enable Goods & Services Tax = Yes.
- Create GST-related ledgers using Alt + C:
- Output CGST, Output SGST, Output IGST → Under “Duties & Taxes” → Type of Duty = GST → Tax Type = Central/State/Integrated.
- Input CGST, Input SGST, Input IGST → Same as above but for input credits.
- Output CGST, Output SGST, Output IGST → Under “Duties & Taxes” → Type of Duty = GST → Tax Type = Central/State/Integrated.
- Once created, Tally automatically recognizes these ledgers when you record sales or purchase vouchers involving GST.
Pro Tip: Create these ledgers once and reuse them across multiple vouchers. You can also export them to other companies using Data → Export Masters.
Conclusion
Key Takeaways on Using Shortcuts for Ledger Creation in Tally ERP 9
Efficient accounting in Tally ERP 9 depends on mastering its keyboard shortcuts and understanding how ledgers function within the system. The shortcut Alt + C remains the most powerful tool for creating ledgers instantly without breaking your workflow.
To summarize the key points covered across this guide:
- Ledger basics: Every financial transaction in Tally is linked to specific ledgers that form your chart of accounts.
- Shortcut efficiency: Alt + C opens the Create Ledger screen instantly; Ctrl + A saves entries; Alt + D deletes them.
- Field understanding: Know the function of each field — Name, Under Group, Inventory Values, Opening Balance — to avoid errors.
- Batch operations: Use the Multiple Ledger Creation feature for large datasets.
- Troubleshooting: If shortcuts fail, check your configuration, keyboard layout, or Tally version.
- Backup regularly: Always create a company data backup before major ledger changes.
By implementing these practices, accountants can maintain precise, well-structured, and compliant financial records.
Boost Productivity and Accuracy with Tally Keyboard Shortcuts
Tally ERP 9 is built to offer both flexibility and speed. While mouse-based navigation works, professionals who rely on keyboard shortcuts experience a substantial boost in productivity.
For a busy accountant, even a few seconds saved per entry can translate into hours saved over a financial quarter. Shortcuts reduce fatigue, eliminate unnecessary clicks, and improve overall accuracy.
In essence:
- For beginners, shortcuts accelerate learning and build muscle memory.
- For professionals, they ensure faster turnaround and higher data accuracy.
With consistent use of shortcuts like Alt + C, Ctrl + A, and Alt + D, ledger management becomes not just faster, but also more reliable and audit-ready.
Whether you’re setting up a new company, migrating data, or performing daily voucher entries, mastering Tally ERP 9’s ledger shortcuts is one of the most valuable skills any accountant or business owner can acquire.
.svg)